Search This Blog

Wednesday, December 30, 2015

Hanging ornament decorations


It's super simple and easy to make. I wanted to add some type of decoration around the house that made it more "Christmas-ie" and for it to not cost hardly anything.
I bought Dollar Tree supplies:

  • 1 small size ornament tube (15 ct)
  • 1 large size ornament tube (7 ct)
  • 1 pack of string (red,green & white)
  • tape (already had)
Just tie the string & cut it at different links and tape the piece up wherever you feel needs attention. I put up the decorations in our hallway and on our windows (not pictured).


Outside our door in our hallway

Tuesday, October 13, 2015

DIY Tombstones

 This Halloween I wanted to have a mass grave site in our

front yard and we already had a few (6) but 
it was not enough to get the look that I was going for.
And as everyone knows I'd rather not spend a lot
of money so I thought why not make my own.
I found a pin on Pinterest where the site used Styrofoam
from a hardware store and then they used their fancy
cutting machine to cut out the shapes and engrave 
the tombstone sayings.
Well I bought a Dollar Tree saw and it fell apart the second
I started cutting so DON'T DO IT!
Supplies:
  • 6 pack insulation foam ($10) - makes 12
  • Gallon of light gray paint ($10) - only used 1/3 so I suggest a smaller size
  • Box cutter
  • Black acrylic paint
  • Large & small paint brushes
  • Black & white spray paint for effect (optional) ($.98 each)
  • Plastic throw away gloves
  • Paint sticks or wire hangers to stake in the ground
First outline the design with a marker to where 2 designs fit on 1 board
Second cut out the design with a box cutter which is really easy.
The picture shows the saw that broke after a couple of moves
I then rubbed off the access Styrofoam (there will be a
big mess so do this outside!)
On some of them I etched out the saying,
I sprayed painted the words in black which was a big
no-no, I guess something in the spray paint melts
the Styrofoam but regular wall paint & acrylic paint is fine
After all the boards are cut out I painted the front and sides gray
and then let them dry for a day and painted the backs.
A second layer was not needed and I only used 1/3 of
the can & we'll be able to use the another time. 
I wanted to make some of the tombstones look older so I
used a spackle/spray method (I don't know the official name) where
you put your finger almost covering the paint spray hole (use the
plastic glove for this) and then shook the can 5 or so inches away from
the tombstone. This creates little dots which gives it an older look.
I uses both white and black for this.
Also I sprayed the black 8 inches away from some of them
to give it a darker gray look.
I googled some stupid/spooky/funny tombstone sayings
and painted it on with acrylic paint.
Some tombstones I made a drippy look with
watered down black paint.
After everything was dry I used both paint sticks & wire hangers
as spikes to secure them in the ground.
The paint sticks I tried to stick half way into the
Styrofoam (did not work) and also tried hot gluing the
paint sticks on the back (does not stick to paint).
The best method is taking apart a wire hanger and cutting
it into 4 pieces. I stuck 2 pieces into each tombstone so
it would be more stable.

So far they are sticking up!

Sunday, September 13, 2015

Easy Halloween DIY

 It's almost that magical time of the year!


Last year I made a couple of super easy projects. 

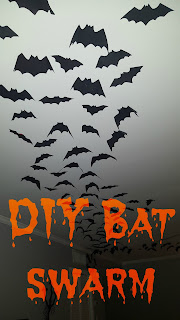
A swarm of bat's flying in
I cut out three different sizes of bat's on black construction paper. I think 
I ended up with 50-60 bat's. I used duct tape to stick them to the ceiling
but I strongly suggest another alternative because when my boyfriend 
took them down (without patience) it took some ceiling paint with it.
I made the swarm look as if it came from our front door and led out to the patio.


Creepy Crawly Spiders

I bought a package of black plastic spider rings
from Dollar tree and cut the ring part
off of the spider (tiresome after a few).
I then cut out small rectangles from large flat magnets
(I used to work at Dunkin Donuts and they were replacing 
doughnut magnet labels so I took the old ones)
Then I hot glued the magnet to the spider and created a swarm.
Easy-peasy 

Supplies:
  • Acrylic paint (orange and yellow)
  • Paint brushes
  • Paper plates 
  • Scissors
  • String
  • Tape

Paint the outer layer of the plate (closest to the edge) with
orange paint. Next ring paint yellow and the inner ring
 is already white naturally. After it drys, cut the plate like
a pie in 6 pieces. Tape string to the back and string around the house. 

Tuesday, September 8, 2015

Ceramic Skull painting

 For my 20th Birthday Maria got me a ceramic skull from Jo-Ann's

and it took me about a year to figure out how I would decorate it.

I outlined my design in pencil and then painted the details. 


Finished product


On a side note I am actually repainting this soon. 
I like change so I change things up  a lot.

Tuesday, September 1, 2015

Paintings

 Every once in a while I concentrate and paint something that usually

takes a lot of time. Most of the time my paintings are
given as gifts but here are a few.

Kristina's x-mas gift
I traced out a skull & cut it out
and then traced the cut out onto a canvas 
(BTW I reuse every canvas, meaning I buy already 
used canvas at the thrift store and paint over it) 
 I started with the darkest parts on the painting and then later
shaded the edges out to flow.
Just starting, do you see all the paint I used!
Almost done, except I moved the cheek hollows down.
I also showed my inspired original photo next to it.
I didn't like the original skull structure so I changed it up a bit.
This is the original artwork
Kristina wanted something in the background so I
watered-down paint & dripped it.

                    Tara's Birthday gift

She often says "Let go and let god" when she is frustrated about one of our 911 callers not giving enough information. (BTW I'm a 911 operator) I thought this would be a great reminder.
I painted a slanted blue ombre, I ruffed up the canvas a little with all the layers of paint I put on (because I painted so many backgrounds before I could decide) and then I painted the quote in silver metallic and added decorative mandalas.
Rachel's Birthday gift
I painted a black background, then splattered on all the bright neon colors I could
 find and then painted her name in metallic silver. 
Maria's no-occasion gift
Hamsa hand
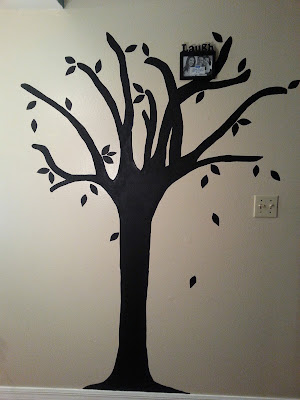
Tree in my hallway
We actually have painted over this now but when I painted it
I added more frames and it was about 4 ft tall. 
Map of the world 
Metallic silver background. I traced the world in pen from a paper
outline that I cut out.
Finished
Keith's 18th Birthday present
Keith's logo
I made a cut-out of his logo and traced it on a white canvas.
After I painted the logo and let it dry I covered it up
and splattered black paint on the background. 

DIY Mary Sanderson Costume

DIY Mary Sanderson costume from the thrift store.                                     It's just a bunch of Hocus Pocus!  DIY video: Find...